Showing posts with label photo editing tip. Show all posts

9/08/2009

Photo Editing Discovery

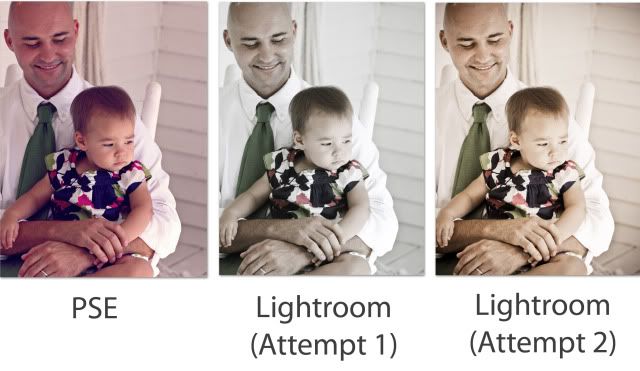
Thanks to technology and easy access to personal computers, editing photos has become so easy (well, after you get the hang of it, that is) nowadays. Editing has also become one of my favorite parts of photography. The choices to edit one photo is just..well, limitless. I have always been a fan of PSE (and still am), but have also heard so much about Lightroom. I finally had a chance to experiment with Lightroom recently, and have to say, wow, I am in love.

Since I am fairly new to Lightroom, I am not going to use this post to show you the "How-to's" Instead, I want to show you what I have discovered Lightroom is capable of, and show you a comparison with PSE.

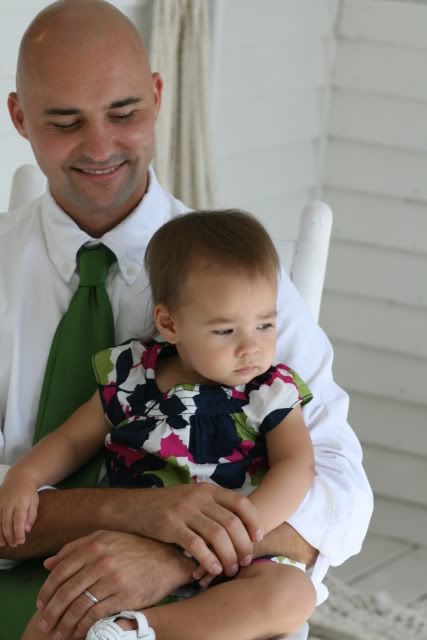
Here's the original photo (also SOOC):


And here are my attempts:


In the PSE version, I used my favorite technique I became familiar with, and I did write a post with the "How-to's" here.

The first attempt in Lightroom--well, it was pretty horrible, now looking at it. Although at the time, I thought it looked good. Until I realized, the overall tone is too "cool". My husband's and daughter's skin looked....dead. Then I tried again, and was finally satisfied with the "Attempt 2" result. The final photo looked warmer, and their skin looked...alive.

Like I have mentioned, since I am fairly new to Lightroom, I am not going to try to explain what I did here..because to be quite frankly, I really don't remember. When I experiment, it's always "a little bit of this.." and "add a little that". Once I become more familar with this software, I will do some more "How-to's". I just hope you enjoy seeing the differences, and may want to go out and try to utilize these photo editing software to the max..in other words...to get your money worth.

Until next time,
8/27/2009

Photo [editing] Tip

I have mentioned this before, but I am not very good at explaning the "How to's". Over here at Sarah's blog, she is so good at it. Not only she has the patience, but she always has the right words. That said, bear with me--I am about to explain one of my favorite photo editing tricks today. Feel free to write to me and ask me any more questions you may have.


I have been experimenting lately, trying to fish out one particular photo editing style that I like. Having looked at almost hundreds of photography sites, and having attempted to mimic the different colors, I have come up with one that I am pretty fond of.

I'll give you an example:

From this (SOOC):


To this:


I love the look of the second picture--that blue tint, with a little bit of magenta--you can still see the original colors, but the whole thing looks softer.

Now, I assume you have some kind of knowledge with PSE (Photoshop Elements). I also assume that if you have something more sophisticated like PCS4 (Photoshop CS4), the procedures are somewhat similar. Correct me if I am wrong.

Here's what you do (under the circumstance that the photo is at a right exposure):

1. In your PSE, open file to a photo you'd like to edit
2. Go to Enhance---->Adjust Sharpness
3. Make the adjustment to SHARPNESS @ 100% and RADIUS @ 1.0 pixels, and check the MORE DEFINED box. (Now, after you have adjusted this once, the next time just go to ENHANCE and AUTO SHARPEN, it should do it for you.)
4. Go to Edit---->Fill Layer---->(under contents choose color. Now a color box will pop out. Scroll to a pinkish color. To be more specific, my color number is e971b5.)
5. Under Blending, choose Color Burn @ 10%.
6. Hit Ok.
7. Now your photo should look slightly darker with a pinkish tint.
8. Next, choose Enhance---->Adjust Lighting---->Levels.
9. Under the "Channels", instead of RGB, choose Blue.
10. At the bottom of this box, slide the OUTPUT level to 50 (by this point, your photo will look rediculously blue, but it's ok.)
11. Next, go to Filter---->Adjustment---->Photo Filter and choose Magenta (and make sure the density is only at 25%)
12. Now, your photo should look horribly blue and pink...but it's ok, because what we are about to do next will save this problem...
13. Now, go to Enhance---->adjust smart fix---->25%
14. Now..your photo should look pretty good.
15. Lastly, go to Filter---->Adjustment---->Photo Filter and choose Yellow.
16. Voila. Done.
17. Sometimes, if I want to lighten up my photo a bit, I go to
Enhance---->Adjust Lighting---->Brightness/Contrast. Only adjust the brightness by 25%.

I know, it sounds a bit crazy..these are the procedures to edit one photo. But trust me, once you get used to it, it becomes routine, and it's going to be fast.

Not bad..going from this:


to this:


..all within a few clicks...

Good luck trying!! And let me know how it works for you!!


Labels

Followers

week 18

week 18

week 31

week 31

About me

I am a wife to a loving, thoughtful husband, a mother of two little angels. Because of my husband's job, we have relocated from New Jersey to Los Angeles three years ago. I miss everything back East..NYC, Gray's Papaya, the subway..but know that LA is where God wants us to be right now. His grace is sufficient; I can't live through a day without depending on Him. My love affair with photography began when I was sixteen years old, when I saw a photograph taken by my cousin at South Seaport in NYC--it was a light switch turned on somewhere inside me. When I came home, I dove into photography. Since then, I've always had a burning desire to pursue photography. It was unfortunately cut short due to choosing another field of study during my college years..not until I became a stay-at-home mom and a God-given opportunity early this year, I was able to finally reunite with this passion..and the rest is history.

rowaszaj@gmail.com

  © Free Blogger Templates 'Photoblog II' by Ourblogtemplates.com 2008

Back to TOP