Photo [editing] Tip
I have mentioned this before, but I am not very good at explaning the "How to's". Over here at Sarah's blog, she is so good at it. Not only she has the patience, but she always has the right words. That said, bear with me--I am about to explain one of my favorite photo editing tricks today. Feel free to write to me and ask me any more questions you may have.
I have been experimenting lately, trying to fish out one particular photo editing style that I like. Having looked at almost hundreds of photography sites, and having attempted to mimic the different colors, I have come up with one that I am pretty fond of.
I'll give you an example:
From this (SOOC):
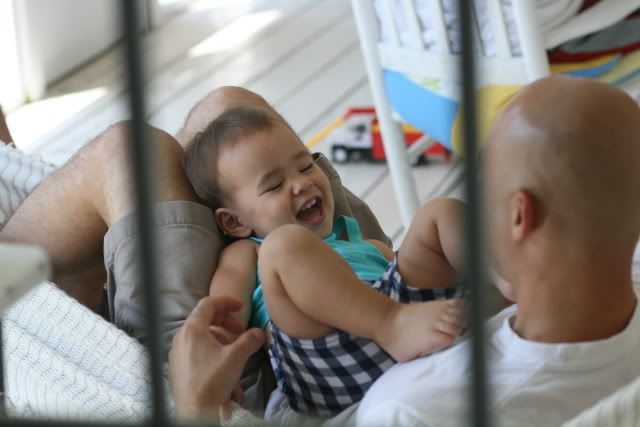
To this:


To this:

I love the look of the second picture--that blue tint, with a little bit of magenta--you can still see the original colors, but the whole thing looks softer.
Now, I assume you have some kind of knowledge with PSE (Photoshop Elements). I also assume that if you have something more sophisticated like PCS4 (Photoshop CS4), the procedures are somewhat similar. Correct me if I am wrong.
Here's what you do (under the circumstance that the photo is at a right exposure):
1. In your PSE, open file to a photo you'd like to edit
2. Go to Enhance---->Adjust Sharpness
3. Make the adjustment to SHARPNESS @ 100% and RADIUS @ 1.0 pixels, and check the MORE DEFINED box. (Now, after you have adjusted this once, the next time just go to ENHANCE and AUTO SHARPEN, it should do it for you.)
4. Go to Edit---->Fill Layer---->(under contents choose color. Now a color box will pop out. Scroll to a pinkish color. To be more specific, my color number is e971b5.)
5. Under Blending, choose Color Burn @ 10%.
6. Hit Ok.
7. Now your photo should look slightly darker with a pinkish tint.
8. Next, choose Enhance---->Adjust Lighting---->Levels.
9. Under the "Channels", instead of RGB, choose Blue.
10. At the bottom of this box, slide the OUTPUT level to 50 (by this point, your photo will look rediculously blue, but it's ok.)
11. Next, go to Filter---->Adjustment---->Photo Filter and choose Magenta (and make sure the density is only at 25%)
12. Now, your photo should look horribly blue and pink...but it's ok, because what we are about to do next will save this problem...
13. Now, go to Enhance---->adjust smart fix---->25%
14. Now..your photo should look pretty good.
15. Lastly, go to Filter---->Adjustment---->Photo Filter and choose Yellow.
16. Voila. Done.
17. Sometimes, if I want to lighten up my photo a bit, I go to
Enhance---->Adjust Lighting---->Brightness/Contrast. Only adjust the brightness by 25%.
I know, it sounds a bit crazy..these are the procedures to edit one photo. But trust me, once you get used to it, it becomes routine, and it's going to be fast.
Not bad..going from this:

to this:

..all within a few clicks...
Good luck trying!! And let me know how it works for you!!

Now, I assume you have some kind of knowledge with PSE (Photoshop Elements). I also assume that if you have something more sophisticated like PCS4 (Photoshop CS4), the procedures are somewhat similar. Correct me if I am wrong.
Here's what you do (under the circumstance that the photo is at a right exposure):
1. In your PSE, open file to a photo you'd like to edit
2. Go to Enhance---->Adjust Sharpness
3. Make the adjustment to SHARPNESS @ 100% and RADIUS @ 1.0 pixels, and check the MORE DEFINED box. (Now, after you have adjusted this once, the next time just go to ENHANCE and AUTO SHARPEN, it should do it for you.)
4. Go to Edit---->Fill Layer---->(under contents choose color. Now a color box will pop out. Scroll to a pinkish color. To be more specific, my color number is e971b5.)
5. Under Blending, choose Color Burn @ 10%.
6. Hit Ok.
7. Now your photo should look slightly darker with a pinkish tint.
8. Next, choose Enhance---->Adjust Lighting---->Levels.
9. Under the "Channels", instead of RGB, choose Blue.
10. At the bottom of this box, slide the OUTPUT level to 50 (by this point, your photo will look rediculously blue, but it's ok.)
11. Next, go to Filter---->Adjustment---->Photo Filter and choose Magenta (and make sure the density is only at 25%)
12. Now, your photo should look horribly blue and pink...but it's ok, because what we are about to do next will save this problem...
13. Now, go to Enhance---->adjust smart fix---->25%
14. Now..your photo should look pretty good.
15. Lastly, go to Filter---->Adjustment---->Photo Filter and choose Yellow.
16. Voila. Done.
17. Sometimes, if I want to lighten up my photo a bit, I go to
Enhance---->Adjust Lighting---->Brightness/Contrast. Only adjust the brightness by 25%.
I know, it sounds a bit crazy..these are the procedures to edit one photo. But trust me, once you get used to it, it becomes routine, and it's going to be fast.
Not bad..going from this:

to this:

..all within a few clicks...
Good luck trying!! And let me know how it works for you!!


1 comments:
Rosina, the photo looks great and thank you for taking the time to share this. I can't wait to try this out. Getting a clear idea of what others are doing to achieve their look is so, so helpful in this learning process. I really do hope (selfishly) you continue to share what you know. It's wonderful to have another resource to look to where it really is explained so clearly. BTW, great capture. I love this private moment between father and daughter...precious.
Post a Comment